Corporate (Organization) Settings
 By creating a corporate membership program and registering the corporate (organization), corporate login will be enabled.
For more details about the corporate membership program, please refer to this link.
⏱Estimated time: About 5 minutes.
How to Register a Contracted Corporate (Organization)
| Management Screen | Details |
| Click Organization under the Brand Management Screen. | |
| Click the Add button on the right side. | |
Turn the Enabled button ON, and enter the Organization Name and Display Name. Organization Name: Set the name of the organization (required). Display Name: Set the name that will be displayed on the customer-facing screen. Since this is the display name after corporate login, you can include honorifics like "Mr." or "Ms." here if needed. | |
Select the "Corporate Management Membership" that was set up earlier as the linked membership program. If you have created a separate corporate membership program for each organization, select the appropriate one here. | |
Corporate Login Method Set the corporate (organization) login ID and password. Corporate members will log in by entering this login ID and password. | |
| Login (IP Address) You can restrict corporate login to be accessible only through specified IP addresses. | |
| Login (URL Referrer) You can restrict corporate login to be accessible only from a specified URL link. | |
| OR Login Conditions When ON, users can log in using any one of the following: the ID/password, IP address, or URL referrer. When OFF, all of the information will be required for login. Example: If ID/password and IP address are set, and OR Login Conditions is OFF, users accessing from the specified IP address will not be able to log in unless they enter the ID/password. | |
Postpaid If you want to enable postpaid for corporate (organization) reservations, turn this setting ON. Note: Postpaid can only be selected for TL Lincoln, Temairuzu, and Rakutsu. | |
Personal Information This setting controls whether the guest's name will be displayed when the organization administrator performs tasks such as confirming reservations. When set to OFF, the name will be displayed as [Guest Name]. | |
Facility Selection Select the facilities that this organization can make reservations for. To allow corporate (organization) bookings for specific facilities only, select the facilities from "Select Facility". |
How to Set Up Organization (Corporate) Administrators (Optional)
By registering an organization (corporate) administrator, they will be able to check how many nights their employees have stayed from their own My Account page.
Open the page for the organization (corporate) you want to set the administrator for, click on the "Organization Administrator List" tab, enter the email address, and click "Add".
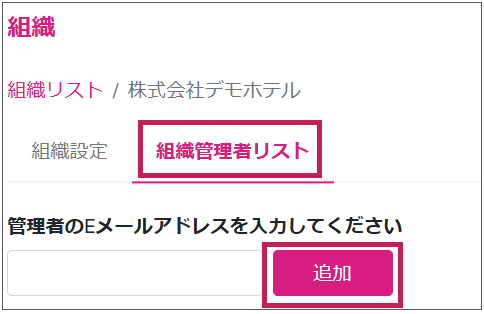
To delete, click the trash bin button on the right side.
Once registered, you will be able to view the details of the stay users.
*Note: Canceled reservations will not be displayed.*
How to Login as an Organization Administrator

The behavior will change depending on the order of member login and organization login.
① Corporate Login → Member Login
With corporate login, access to member information (personal information) is possible.
The organization's membership program will be applied.
If the organization has an administrator registered, the administrator page will be accessible.
Member registration information can be used during booking, but points cannot be used.
② Member Login → Corporate Login
Only corporate login is active, and member information cannot be accessed.
When corporate login is performed, the individual member will be logged out automatically.
From Login, select Corporate Login.
Once the screen switches to Corporate Login, enter the corporate ID and password, and log in.
After corporate login is completed, the [Login] label in the top right will change to the [Company Name].
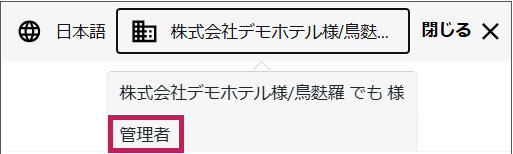
Select [Company Name], then click Member Login.
Login as a member using the registered organization administrator's email address.
When the display in the top right changes to [Company Name/Organization Administrator Name], the login is successful.
Selecting [Company Name/Organization Administrator Name] and clicking Administrator will allow you to view the entire organization's booking confirmations.
You can specify a period for displaying reservations from 1 month to 12 months ahead from the specified month.
Set a Day Limit Per Organization (Optional)
You can set the maximum number of days an organization can stay within one year, based on the start date. This can be configured according to the corporate contracts that the accommodation facility has with the companies.
When this feature is turned ON, you can set the maximum number of stay days per organization, allowing you to manage the number of annual stays at member prices for each organization.
Note:
- There is no upper limit on the maximum number of stays.
- The maximum stay number can only be set after the organization is created and the maximum stay number setting is turned ON, starting from 10:00 AM on the following day.
- It will only be displayed for organizations with valid data.
- Reservations at the regular price cannot be made, and once the maximum stay number is exceeded, no further reservations will be accepted.
| Open Brand Management Screen → Settings → Organization Settings → Feature Settings. | |
| Check the Maximum Stay Number Setting and enter the Start Date. Start Date The maximum stay number is managed by fiscal year. Set the start date for the fiscal year. Note: The start date is only allowed to be set once per brand. Note: The setting screen will not be displayed on the same day as the organization is created. Please note that this setting is updated once a day, so if added today, it will be available starting tomorrow. | |
Once you check the "Maximum Stay Number Setting", the "Maximum Stay Number Setting" tab will appear on the Organization Management Screen the following day, allowing you to configure it. Maximum: Set the maximum number according to the unit. Unit: You can select between Room or Person. Stayed Number: The number of completed reservations will be displayed. Reservation Count: The number of reserved bookings will be displayed. Other System Reservations: If you want to count reservations from other systems, you can manually enter the number. Available Stay Count: The remaining available stay count for the set period will be displayed. Enabled: You can turn the Maximum Stay Number Setting ON or OFF. |
CSV Download of Organization Data
From the organization management screen, you can select the type of data from the Download button and download the data in CSV format.
*Note: Even if the search filters narrow the results, the download will include the entire dataset.*
Related Articles
Corporate (Organization) Feature Settings
Here is how to register a corporate organization: From the Brand Management screen, go to [Reservation Engine Settings] → [Organization]. Please configure the settings as shown below. Feature Items and Descriptions Feature Description Maximum Stay ...Corporate Membership Program
By using the corporate (organization) membership program, companies with corporate contracts can make reservations on a dedicated page. See here for how to add corporate (organization). ⏱ Estimated time: about 30 minutes. Difference from Individual ...Area Settings
The area setting enables area-based searches using the search bar on the brand top page of a chain hotel. Note: If you wish to implement this on your brand page, a dedicated account will be issued. Please contact tripla before proceeding with the ...First-Party Cookie Settings
If you are switching to the iframe-based subdomain, it is recommended to configure the first-party cookie settings before setting up the subdomain. If the subdomain is set up first and the first-party cookie setting is not yet complete, a popup ...Chatbot Widget Settings
You can configure the chatbot’s appearance, name, icon image, and more. ⏱ Estimated time: about 10 minutes Where to configure In the facility management screen, go to Settings → Widget Settings → open the Chatbot Widget. You can configure various ...