tripla Guide

This service enables guests to view the in-room information, which was previously provided via paper or VOD, on their own smartphones.
※To use this service, a contract for tripla Bot and tripla Guide is required.

<Transition to CM3.0>
Due to new feature updates, tripla Guide will automatically transition to the new management screen, CM3.0.
※Please note that only the “Flyer” feature will remain on CM2.0 temporarily.
※Please note that only the “Flyer” feature will remain on CM2.0 temporarily.
Place to configure
Property Management Screen – tripla Guide
When clicked, it will automatically transition to the CM3.0 screen.
As of February 2025, only the “Flyer” feature will remain on CM2.0. Thank you for your understanding.
Create the content to be displayed
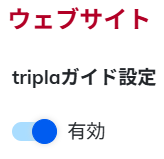
Click “Website” from the left menu to open the creation page.
tripla Guide setting button
By toggling it ON/OFF, you can control the visibility of the screen accessed by customers via the QR code on the flyer.
When enabled, the Guide page will be visible to customers. If newly introduced, the switch is set to ON by default. ※Please note that if this setting is not enabled, the preview will also not be displayed. | |
When disabled, the Guide page will not be shown. ※If customers scan the QR code and try to view it on their smartphones, please make sure to turn the switch ON beforehand. If the smartphone screen is refreshed while the switch is OFF, the page will not be displayed, as shown in the image on the right. |
Appearance
You can edit the design of the page to be displayed.
| If you select “Display logo” and upload an image, it will be shown as illustrated below. ※If no image is uploaded, the property name will be displayed. | |
If set to “Hidden,” the property name will be shown instead. This name can also be edited. |
Image displayed at the top of the page
You can choose to remove the header image and show only the content buttons, display a single image, or use an image slider to show multiple images.
How to set up the image slider
Select “Image Slider” and click “+ Create New Image Slider.”
You will be redirected to the image slider creation screen.
※You can also access this screen from “Shared Components” in the left-hand menu.
お客様側には表示されません。管理画面の一覧に表示されます。 | |||||
It will not be displayed to customers. It will only appear in the management screen list. Upload an image. Please register an image with an aspect ratio of 2:1.
If you enter a URL, tapping the image will redirect the user to the linked page. | |||||
Click to add more image upload fields. | |||||
| You can preview the entered content. | |||||
| You can cancel, save, or delete the created content. After uploading images or adding a URL link, be sure to click the Save button. |
Once the image slider content is created and saved, it will become selectable from the dropdown menu on the “Website” screen.
If the number of sliders increases, you can also search for them using the search bar.
Slide Playback
You can choose whether the image slider plays automatically or is switched manually.
| 手動で画像を切り替えます。この場合、1枚目に登録した画像が最初に表示されます。 |
Icon Color
You can set the color of the icons. ※The background color of the icons cannot be changed. |
Introductory Greeting
This message will be displayed to customers. Only text input is supported. |
Displayed Content
Frequently used content is preloaded by default. Some items can be used simply by editing the text slightly.
In addition, you can freely create your own content.
Open the content page from Shared Components.
Click Create Content Page to go to the content creation screen.
Select the type of content.
You can create a link button simply by entering an icon, title, and link URL. | ※When setting it as a link, the destination URL is required. If you do not enter a link, you will not be able to save an an error will occur. |
You can freely create a page using the editor. It supports inserting images and URLs, adjusting text size, and more. For instructions on how to use the editor, click here. | |
Custom bots created in Bot can also be displayed in Guide. | You can use input forms and other features created with custom bots. ※If you haven’t created a custom bot first, no options will appear in the dropdown menu. |
Tourist Spots and Nearby Restaurants
This feature introduces tourist spots and restaurants within a specified distance.
These two content types are pre-generated using custom bots, so you can use them immediately by switching them ON.
To edit the distance or titles, click the pencil-shaped edit icon for the content.
Click the square link button in the top right corner.
You can edit the icon, title, distance (unit: meters), and display period.
The search range for “Tourist Spots” and “Nearby Restaurants” is based on the latitude and longitude set in the Bot’s [Property Management Screen] – [Settings] – [Property Information].
Icon Types
You can either select from the default icons, upload your own icon image, or use an image directly as the icon.
You can use an uploaded image as the icon. In this case, the color cannot be changed from the management screen. | |
You can also set the uploaded image as the background of the icon. |
If using a custom image, you can choose not to display icon text.
| By unchecking the box, you can use images that include text or logo images as icons. |
Display Period
By specifying the display period of the created content, it can be automatically shown or hidden during that timeframe.
This is useful for limited-time content.
If no period is specified, the content will remain visible at all times. If the content switch is OFF, the content will not be displayed regardless of the display period.
Displaying Created Content
Click “Add” and select the created content from the dropdown under “Select Shared Component.”
When you click the Save button, the content will be added in the ON state.
※At this stage, it will not yet appear in the preview.
Once you click Save, the added content will be reflected and can be checked using the preview QR code.
Reordering and ON/OFF Switching of Content
You can change the display order by dragging and dropping content.
By turning the switch OFF, the content will be hidden while retaining its settings.
Check the content in the preview
On the screen where you add content, you can view a preview of the content you created.

If Guide is not enabled, the preview will not function. Please make sure it is enabled before checking the preview.
If edits are needed, you can move to the content creation page using the button at the top right.
By clicking the Save button on the Website page and scanning the QR code with a smartphone, you can preview the actual display screen.
To preview a custom bot, click the pencil-shaped edit icon on the content, then click the square link button in the top right corner to check via the custom bot link.
By clicking Test Bot in the upper right corner, you can preview the settings of the custom bot.
Click the “>” button on the right to slide through the content.

Up to 10 tourist spots and restaurants are displayed.
Tourist spots are shown based on popularity within the specified radius, while restaurants are displayed based on proximity.
When you click [Open in Google Maps], it will redirect to the Google Maps screen.
SNS
You can link to various SNS platforms.
To set the link destination, click the pencil-shaped edit icon to open the content page and edit the title and other details.
Menu Bar
This switch toggles the display of the menu. If the toggle button is blue, the menu is enabled and visible.
Set up the QR code for scanning
Place the QR code for customers to scan in guest rooms or at the front desk.
The QR code can be downloaded from the “Flyer” section.
※As of February 2025, the Flyer screen will automatically transition to CM2.0. Thank you for your understanding.
On the “tripla Guide Flyer” screen, click + Add.
The flyer settings screen will appear.
It will not be displayed to customers. It will appear in the flyer list. You can also search using the name of the flyer you created. | |
The flyer can be edited. For instructions on how to use the editor, click here. | |
A preview of the flyer you created will be displayed. You can download the flyer by clicking Download PDF Flyer. The print size can be adjusted in the print settings after downloading. | |
You can create flyers with different QR codes for each room. By entering a custom name, you can add a name before or after the room number. Clicking Apply will generate QR codes for each room. You can also select flyers to bulk download or delete the checked flyers. |
Accepting Requests
※The request feature is currently under preparation.
Check Usage Status
You can view the usage status of Guide on the dashboard.
For instructions on how to read the dashboard, please refer to this page.
Displayed Language
The default display language is based on the default language set for tripla Bot under [Settings] > [Language Settings] in the property management screen.
When another language is selected, the content will be translated using Google’s automatic translation.

[Chat] and [FAQ] can only be displayed in 5 languages: Japanese, English, Korean, Traditional Chinese, and Simplified Chinese.
If you don't want specific text to be translated
If there is a part of the content that you don’t want to be translated by the Google plugin (e.g., Wi-Fi SSID), you can prevent it using an HTML tag:
<span class="notranslate">Text you don’t want to be translated</span>
If an error message appears
“Please enter the property website URL.”
If this error message is displayed, please go to the property information section in Bot, enter the homepage URL in the website field, and click “Save.”
In principle, we enter the property URL on our side.
However, in rare cases—such as with newly opened properties that begin using the system before their homepage is published—the URL may not be entered. In such cases, we kindly ask you to input it manually.
However, in rare cases—such as with newly opened properties that begin using the system before their homepage is published—the URL may not be entered. In such cases, we kindly ask you to input it manually.
Related Articles
Guide
If you have a Guide subscription, you can access the PDF version of the dashboard anytime. The dashboard can be viewed from both the brand management screen and the facility management screen; however, the available sections differ between the two. ...GA4 Setup Guide
Required Pre-Setup Items tripla Book settings must be completed. Subdomain settings must be configured. A Google Analytics 4 (GA4) account must be created. A Google Tag Manager (GTM) account and container must be created. GA4 measurement settings ...tripla Bot Terms of Use
tripla Bot Terms of Use Last updated: 2025/4/15tripla Book Terms of Use
tripla Book Terms of UseGuide Function for Group Properties
When this setting is enabled from the property display settings, if there is no availability for the dates the guest is searching, up to three nearby group properties will be shown to guide the guest to alternative options. With this setting active, ...